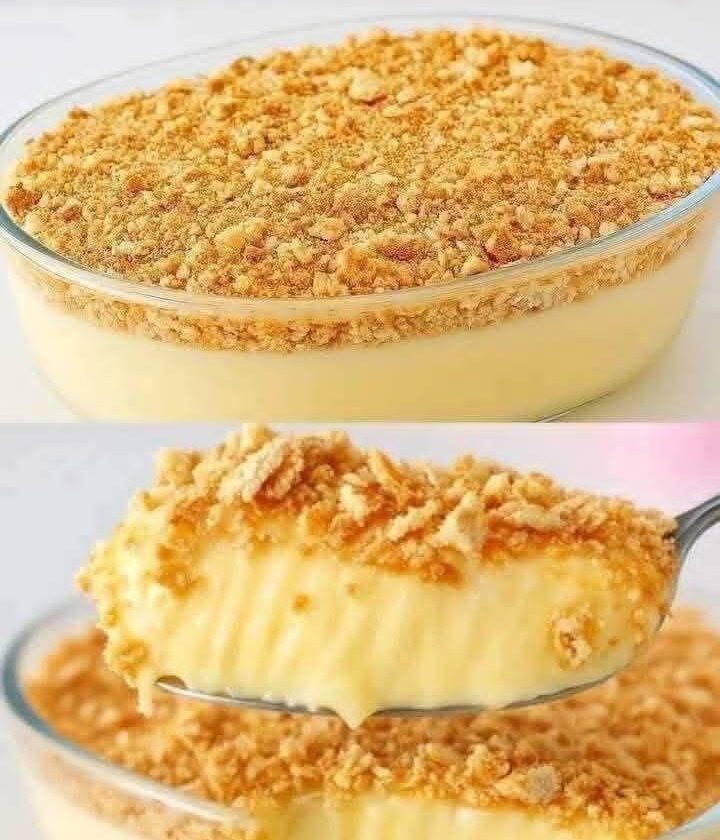
If you are searching for a quick no-bake dessert recipe that is creamy, rich, and requires no oven at all, this No-Bake Biscuit Pudding is the perfect solution. It is a layered dessert made with silky homemade custard and crushed biscuits, creating a soft yet slightly crunchy texture in every bite.
Often known as biscuit pudding, layered biscuit dessert, or no-bake custard biscuit cake, this recipe is a favorite among home cooks because it is simple, budget-friendly, and incredibly satisfying.
This dessert is especially popular during warm weather when turning on the oven feels unnecessary. With just a few pantry staples like milk, condensed milk, cornstarch, and biscuits, you can create a chilled dessert that tastes like something from a bakery.
Whether you’re preparing it for family gatherings, parties, or weekend cravings, this no-bake pudding delivers both comfort and elegance with minimal effort.
🍮 Why No-Bake Biscuit Pudding Is So Popular
This dessert has gained popularity across home kitchens worldwide because it checks all the boxes for convenience and taste.
❄️ 1. No Oven Required Dessert Recipe
Perfect for hot days or quick dessert cravings, this recipe requires zero baking.
🍶 2. Creamy Custard Texture
The smooth milk-based custard creates a rich, melt-in-your-mouth layer.
🍪 3. Crunchy Biscuit Layers
Crushed biscuits add structure and texture, balancing the creamy filling.
⏱️ 4. Quick & Easy Preparation
With simple ingredients and basic cooking steps, it comes together quickly.
🎉 5. Perfect Make-Ahead Dessert
It tastes even better after chilling, making it ideal for parties and gatherings.
🧾 Ingredients Breakdown for Biscuit Pudding Dessert
This recipe uses basic pantry ingredients that combine to create a luxurious dessert experience.
🥛 Creamy Custard Base Ingredients
- 3 cups (700 ml) whole milk
- 1 can (14 oz) sweetened condensed milk
- 4 tablespoons cornstarch
- 1 teaspoon vanilla extract
- 1/4 cup butter (optional, for extra richness)
🧠 Custard Ingredient Purpose Explained
🥛 Whole Milk
Forms the base of the pudding and provides creaminess.
🍯 Sweetened Condensed Milk
Adds sweetness and thick texture while enhancing richness.
🌽 Cornstarch
Acts as a natural thickener to create a custard-like consistency.
🍦 Vanilla Extract
Adds aroma and depth of flavor.
🧈 Butter (Optional)
Makes the pudding extra smooth, glossy, and rich.
🍪 Biscuit Layers
- 2 packets digestive biscuits or graham crackers (or any plain biscuits)
These biscuits provide structure and crunch. As they soften in the custard, they create a cake-like texture.
🍪 Topping
- Crushed biscuits or graham cracker crumbs
This final layer adds texture and visual appeal.
🧠 Ingredient Tips for Best No-Bake Biscuit Dessert
✔ Choose Plain Biscuits
Digestive or graham crackers work best because they absorb moisture evenly.
✔ Avoid Overcooking Custard
Overheating can cause lumps or reduce smooth texture.
✔ Use Cold Milk for Mixing Cornstarch
Helps prevent clumping before cooking.
✔ Chill Properly
Refrigeration is essential for the dessert to set correctly.
👩🍳 Step-by-Step Preparation Guide (Expanded Method)
🍶 Step 1: Creating the Silky Custard Base
Begin by pouring whole milk into a medium-sized saucepan. Add sweetened condensed milk and cornstarch.
Whisk everything thoroughly before heating. This is important to ensure the cornstarch fully dissolves and no lumps form in the mixture.
Place the pan over medium heat and stir continuously. As the mixture warms up, it will gradually begin to thicken.
After about 5–7 minutes, the liquid will transform into a thick, smooth custard. The texture should resemble pudding—creamy, glossy, and slightly heavy.
Once thickened, remove the pan from heat and immediately stir in vanilla extract for added flavor.
If you want a richer dessert, add butter at this stage and mix until fully melted and incorporated. This step gives the pudding a silky finish and enhances mouthfeel.
Allow the custard to cool slightly before layering.
🍪 Step 2: Preparing the Biscuit Base Layer
Take half of the biscuits and crush them into fine crumbs.
You can do this in two ways:
- Place biscuits in a sealed bag and crush using a rolling pin
- Use a food processor for finer texture
Take a glass baking dish or deep serving tray for better presentation.
Spread a thin, even layer of crushed biscuits at the bottom of the dish. This forms the base of the dessert and provides a crunchy foundation for the creamy layers above.
🍮 Step 3: First Layer of Custard
Pour half of the prepared custard mixture over the biscuit base.
Use a spatula or spoon to spread it evenly across the surface. Make sure the custard covers the biscuit layer completely so it begins softening and absorbing flavor.
This combination of soft custard and crunchy biscuits is what creates the signature texture of this dessert.
🍪 Step 4: Adding the Second Biscuit Layer
Now take another portion of biscuits and crush them again.
Sprinkle this crushed biscuit layer evenly over the custard. This adds extra texture and creates a layered dessert structure.
You can adjust the thickness depending on how crunchy or soft you prefer the final dessert.
🍮 Step 5: Final Custard Layer Assembly
Pour the remaining custard over the biscuit layer.
Spread it gently so it covers the entire surface and seals in the biscuit crumbs underneath. The top should look smooth and creamy.
This final layer ensures that all biscuit layers soften slightly during chilling while still maintaining texture contrast.
🍪 Step 6: Finishing Touch with Crushed Biscuits
Sprinkle crushed biscuits or graham cracker crumbs on top of the dessert.
This final topping adds visual appeal, texture, and a slightly crunchy finish that contrasts beautifully with the creamy layers beneath.
❄️ Step 7: Refrigeration and Setting Process
Place the dish in the refrigerator for at least 2 hours.
For best results, chill overnight. This allows:
- The custard to fully set
- The biscuits to soften slightly
- Flavors to blend together
Once set, the dessert becomes firm enough to slice or scoop easily.
💛 Why This Dessert Works So Well
No-bake biscuit pudding is loved because it delivers:
- Creamy custard richness
- Soft cake-like biscuit layers
- Balanced sweetness
- Minimal preparation effort
- Elegant presentation without baking
It’s a dessert that feels indulgent but is extremely simple to prepare.
🍽️ Serving Suggestions for Biscuit Pudding
This chilled dessert can be served in multiple ways:
- Cut into neat squares for a clean presentation
- Scooped into bowls for a casual dessert
- Served in glass cups for layered dessert jars
Best paired with:
- Tea or coffee
- Fresh fruit
- Light whipped cream topping
🧊 Storage Tips
- Store covered in the refrigerator
- Best consumed within 2–3 days
- Keep chilled at all times for best texture
🔁 Optional Variations
You can easily customize this dessert:
- Add cocoa powder for chocolate biscuit pudding
- Add cinnamon for warm spice flavor
- Layer with bananas or strawberries
- Use chocolate biscuits for richer taste
📝 Final Thoughts: The Perfect No-Bake Dessert for Any Occasion
This No-Bake Biscuit Pudding is a simple yet elegant dessert that brings together creamy custard and crunchy biscuits in perfect harmony. It is quick to prepare, budget-friendly, and ideal for any occasion—from family dinners to festive gatherings.
With no oven required and minimal effort, it remains one of the easiest homemade desserts that still feels special and indulgent.
🍮 PART 2: SIMPLE RECIPE
🧾 Ingredients
- 3 cups whole milk (700 ml)
- 1 can sweetened condensed milk (14 oz)
- 4 tbsp cornstarch
- 1 tsp vanilla extract
- 1/4 cup butter (optional)
- 2 packets digestive biscuits or graham crackers
- crushed biscuits for topping
👩🍳 Instructions
- Mix milk, condensed milk, and cornstarch in a pan. Cook until thick. Add vanilla and butter.
- Crush half the biscuits and layer in a dish.
- Pour half the custard over biscuits.
- Add another biscuit layer.
- Pour remaining custard on top.
- Sprinkle crushed biscuits on top.
- Chill for at least 2 hours before serving.
🍽️ Serve
Serve chilled as slices or scoops for a creamy, crunchy dessert treat.