Few treats bring back childhood memories quite like homemade hard candy. With its glossy appearance, vibrant colors, crunchy texture, and bold flavors, this classic sweet has remained popular for generations. Whether tucked into holiday tins, shared as edible gifts, or enjoyed as an old-fashioned sugary treat, hard candy continues to be one of the easiest and most satisfying homemade candy recipes you can make in your own kitchen.
This homemade hard candy recipe combines simple pantry staples like sugar and corn syrup with concentrated flavor oils and food coloring to create sparkling candy pieces that look beautiful and taste incredible. From peppermint and cinnamon to fruity flavors and wintergreen, the customization possibilities are nearly endless.
What makes this recipe especially appealing is that it transforms just a handful of ingredients into professional-looking candy using simple candy-making techniques. Once you understand the process and reach the correct hard crack stage, you can create endless flavor combinations for holidays, birthdays, party favors, or homemade edible gifts.
This old-fashioned candy recipe is also ideal for beginner candy makers because it teaches the fundamentals of sugar cooking while producing impressive results. The glossy finish, satisfying crunch, and bright flavor make these candies feel both nostalgic and elegant at the same time.
Whether you’re making Christmas candy, homemade peppermint sweets, colorful party treats, or traditional candy gifts, this easy hard candy recipe is a timeless kitchen favorite.
Why Homemade Hard Candy Is Still So Popular
Even with countless store-bought candy options available today, homemade hard candy remains beloved because of its simplicity, versatility, and handmade charm.
There’s something special about creating candy from scratch and watching ordinary ingredients transform into colorful crystal-like sweets.
Here are some reasons people continue to love making homemade hard candy:
1. Endless Flavor Possibilities
One of the biggest advantages of homemade candy is customization. You can create nearly any flavor combination you like, including:
- Peppermint
- Cinnamon
- Lemon
- Cherry
- Watermelon
- Orange
- Wintergreen
- Green apple
- Strawberry
- Cotton candy
Each batch can be completely unique.
2. Beautiful Homemade Gifts
Hard candy stores well and looks visually stunning when packaged in jars, tins, or decorative bags. It’s a thoughtful homemade gift during holidays and special occasions.
3. Budget-Friendly Sweet Treat
This recipe uses affordable ingredients found in most kitchens, making it a low-cost homemade dessert option.
4. Fun Kitchen Project
Making candy is both creative and educational. Watching sugar transform through heat into glossy candy feels almost magical.
5. Long Shelf Life
When stored correctly, homemade hard candy remains fresh for weeks, making it ideal for preparing ahead of holidays or parties.
The Science Behind Perfect Hard Candy
Candy making is a combination of cooking and chemistry. Understanding a few basic principles helps ensure perfect results every time.
Why Sugar Temperature Matters
As sugar syrup heats, water evaporates and the concentration of sugar increases. Different temperatures create different candy textures.
For hard candy, the syrup must reach the “hard crack stage,” which occurs at approximately:
300∘F=150∘C
At this temperature, the candy hardens completely once cooled.
If the syrup doesn’t reach this stage, the candy may turn sticky or chewy instead of crisp and crunchy.
Why Corn Syrup Is Important
Corn syrup plays a major role in successful candy making.
Its purpose is to:
- Prevent sugar crystallization
- Create a smooth texture
- Improve clarity
- Help maintain a glossy appearance
Without corn syrup, sugar crystals can form during cooking, leading to grainy or cloudy candy.
This ingredient helps produce the classic glass-like appearance associated with traditional hard candy.
Choosing the Best Flavor Oils
Concentrated candy oils are essential because regular extracts often lose flavor during high-temperature cooking.
Popular candy oils include:
- Peppermint oil
- Cinnamon oil
- Wintergreen oil
- Lemon oil
- Orange oil
- Cherry oil
- Raspberry oil
Because candy oils are highly concentrated, only a small amount is needed.
Always add flavoring after removing the syrup from heat to preserve the flavor intensity.
Why Homemade Candy Feels So Nostalgic
Homemade candy often reminds people of:
- Holiday traditions
- Grandparents’ kitchens
- Vintage candy shops
- Christmas treat tins
- School fairs
- Homemade gifts
The bright colors, glossy shine, and crunchy texture instantly create feelings of comfort and nostalgia.
Many families pass candy recipes down through generations because they become part of holiday memories and family traditions.
The Importance of a Candy Thermometer
One of the most important tools in candy making is a reliable candy thermometer.
Because sugar changes texture based on exact temperature, guessing can easily lead to failed candy.
A thermometer ensures the syrup reaches the proper hard crack stage without burning.
Benefits of using a candy thermometer include:
- Accurate temperature control
- Better consistency
- Improved texture
- Less risk of scorching
- More reliable results
Step-by-Step Breakdown of the Candy-Making Process
Step 1: Combining Sugar and Corn Syrup
The sugar and corn syrup form the foundation of the candy mixture.
As the ingredients heat together, the sugar dissolves into a clear syrup.
Using a heavy-bottomed saucepan helps distribute heat evenly and prevents scorching.
Step 2: Heating Without Stirring
Once the syrup begins boiling, avoid stirring excessively.
Stirring can introduce sugar crystals that may ruin the smooth texture.
Instead, allow the syrup to boil undisturbed until it reaches the proper temperature.
Patience is key during this stage.
Step 3: Reaching Hard Crack Stage
At 300°F, the syrup transforms into hard candy once cooled.
The syrup becomes thick, bubbling, and slightly golden.
Timing matters greatly because overheating can burn the sugar and create bitterness.
Step 4: Adding Flavor and Color
After removing the pan from heat, quickly stir in the candy oil and food coloring.
This step must happen quickly because the syrup begins hardening rapidly as it cools.
Bright food coloring creates eye-catching candy that looks festive and professional.
Step 5: Pouring and Cooling
The hot syrup is poured into a prepared pan or silicone mold and left undisturbed until completely hardened.
Silicone baking mats work especially well because hardened candy releases easily once cooled.
Step 6: Breaking Into Pieces
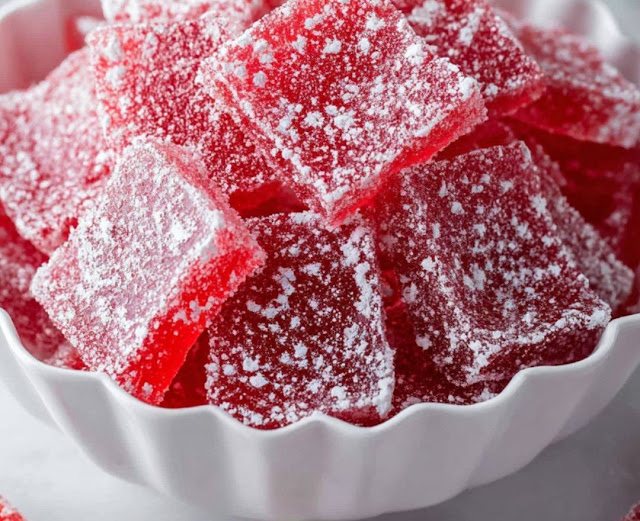
Once fully cooled, the candy is broken into irregular shards or bite-sized pieces.
Dusting with powdered sugar helps prevent sticking and keeps the candy easier to handle.
Best Flavor Combinations to Try
One reason hard candy remains so enjoyable is the endless flavor creativity.
Some favorite combinations include:
Peppermint Candy
Classic red-and-white holiday candy with cool mint flavor.
Cinnamon Spice Candy
Warm and bold with old-fashioned candy-shop flavor.
Citrus Blend
Lemon and orange create refreshing fruity sweetness.
Mixed Berry Candy
Cherry, raspberry, and strawberry oils combine beautifully.
Rainbow Fruit Candy
Use multiple colors and flavors for colorful candy assortments.
Creative Ways to Package Homemade Candy
Homemade hard candy makes excellent edible gifts.
You can package candy in:
- Decorative mason jars
- Clear cellophane bags
- Holiday tins
- Ribbon-tied gift boxes
- Glass candy dishes
Adding labels and festive ribbons makes the presentation even more charming.
Tips for Perfect Homemade Hard Candy
Use a Heavy Saucepan
Thin pans heat unevenly and can burn sugar quickly.
Avoid Humid Weather
Humidity can make hard candy sticky and soft.
Dry weather produces the best candy texture.
Prepare Everything Ahead
Once the syrup reaches temperature, the process moves quickly.
Have pans, coloring, and flavoring ready beforehand.
Work Carefully
Molten sugar is extremely hot and can cause severe burns.
Always use caution while handling hot syrup.
Don’t Double the Recipe
Large batches are harder to control and may cook unevenly.
Common Mistakes to Avoid
Stirring During Boiling
This can trigger sugar crystallization and create grainy candy.
Incorrect Temperature
Undercooked syrup results in sticky candy, while overcooked syrup can burn.
Adding Flavor Too Early
Heat can weaken flavor oils if added before removing from heat.
Improper Storage
Exposure to moisture can ruin candy texture.
How to Store Hard Candy Properly
To maintain freshness and crunch:
- Store in airtight containers
- Keep in a cool, dry place
- Separate layers with parchment paper if needed
Avoid refrigeration because moisture can create stickiness.
When stored correctly, homemade hard candy can remain fresh for several weeks.
Why Homemade Candy Makes Great Holiday Treats
Hard candy is especially popular during:
- Christmas
- Valentine’s Day
- Birthday parties
- Baby showers
- Weddings
- Halloween
- Gift exchanges
Its vibrant colors and sparkling appearance make it ideal for festive celebrations.
Peppermint hard candy, especially, remains a holiday favorite.
Why This Recipe Is Great for Beginners
Unlike some complicated desserts, hard candy requires only a few ingredients and basic kitchen tools.
Once you understand temperature control, the process becomes surprisingly simple.
This recipe teaches valuable candy-making fundamentals while producing beautiful results that feel impressive and rewarding.
Final Thoughts
This homemade hard candy recipe proves that classic sweets never go out of style. With its glossy shine, crunchy texture, and bold customizable flavors, it’s a nostalgic treat that brings creativity and sweetness into any kitchen.
Using simple pantry ingredients and a straightforward cooking process, you can create beautiful old-fashioned candy that’s perfect for holidays, edible gifts, dessert tables, or everyday sweet cravings.
Whether you prefer peppermint, cinnamon, citrus, or fruity candy flavors, this versatile recipe allows endless customization while delivering the satisfying crunch and classic appearance people have loved for generations.
Once you master the hard crack stage and learn the basics of candy making, homemade hard candy becomes a fun and rewarding tradition you’ll want to make again and again.
Part 2: Simple Recipe Card
Easy Homemade Hard Candy Recipe
Ingredients
- 2 cups granulated sugar
- ¾ cup light corn syrup
- 10 drops concentrated flavored candy oil (peppermint, cinnamon, wintergreen, lemon, or fruit flavors)
- Food coloring of choice
- Powdered sugar for dusting
- Optional: edible glitter or flavored extracts for decoration
Instructions
Step 1: Heat the Sugar Mixture
In a heavy-bottomed saucepan, combine the granulated sugar and light corn syrup over medium-high heat.
Step 2: Cook to Hard Crack Stage
Allow the mixture to boil without stirring until it reaches 300°F (150°C) on a candy thermometer.
Step 3: Add Flavor and Color
Remove the saucepan from heat immediately. Once bubbling settles slightly, quickly stir in the candy oil and food coloring.
Step 4: Pour and Cool
Carefully pour the hot candy mixture into a greased pan or silicone-lined baking dish. Leave undisturbed until completely hardened.
Step 5: Break Into Pieces
Once cooled, break the candy into small shards or bite-sized pieces.
Step 6: Dust and Store
Lightly toss the candy with powdered sugar to prevent sticking. Store in an airtight container.
Helpful Tips
- Always use a candy thermometer for accurate results.
- Avoid stirring while the syrup boils.
- Work quickly once flavoring is added.
- Store candy away from humidity to keep it crisp.